Single Sign-On (SSO)
Learn how to set up single sign-on with LeanIX.
Tip
To request an SSO setup for your workspace, please submit a ticket to LeanIX Support.
Overview
Single sign-on (SSO) is a centralized authentication process that allows users to access multiple applications with a single set of login credentials.
LeanIX supports SSO through the Security Assertion Markup Language (SAML) 2.0 protocol. SAML is a standard protocol used in SSO implementations to securely exchange authentication and authorization data between an identity provider (IdP) and a service provider (SP).
We offer the following options for the SSO setup:
- Authentication only: Authentication (system access) is managed through SSO, while authorization (role management) is handled within LeanIX. This setup adheres to the standard authorization model.
- Authentication and authorization: Both authentication (system access) and authorization (role management) are handled through SSO. This setup allows you to use extended authorization features, such as Virtual Workspaces and custom roles.
LeanIX supports just-in-time (JIT) provisioning, a process in which user accounts are dynamically created when users sign in to LeanIX through SSO for the first time.
Authentication Flow
LeanIX supports SP-initiated SSO. The following image illustrates the SAML 2.0 authentication flow.
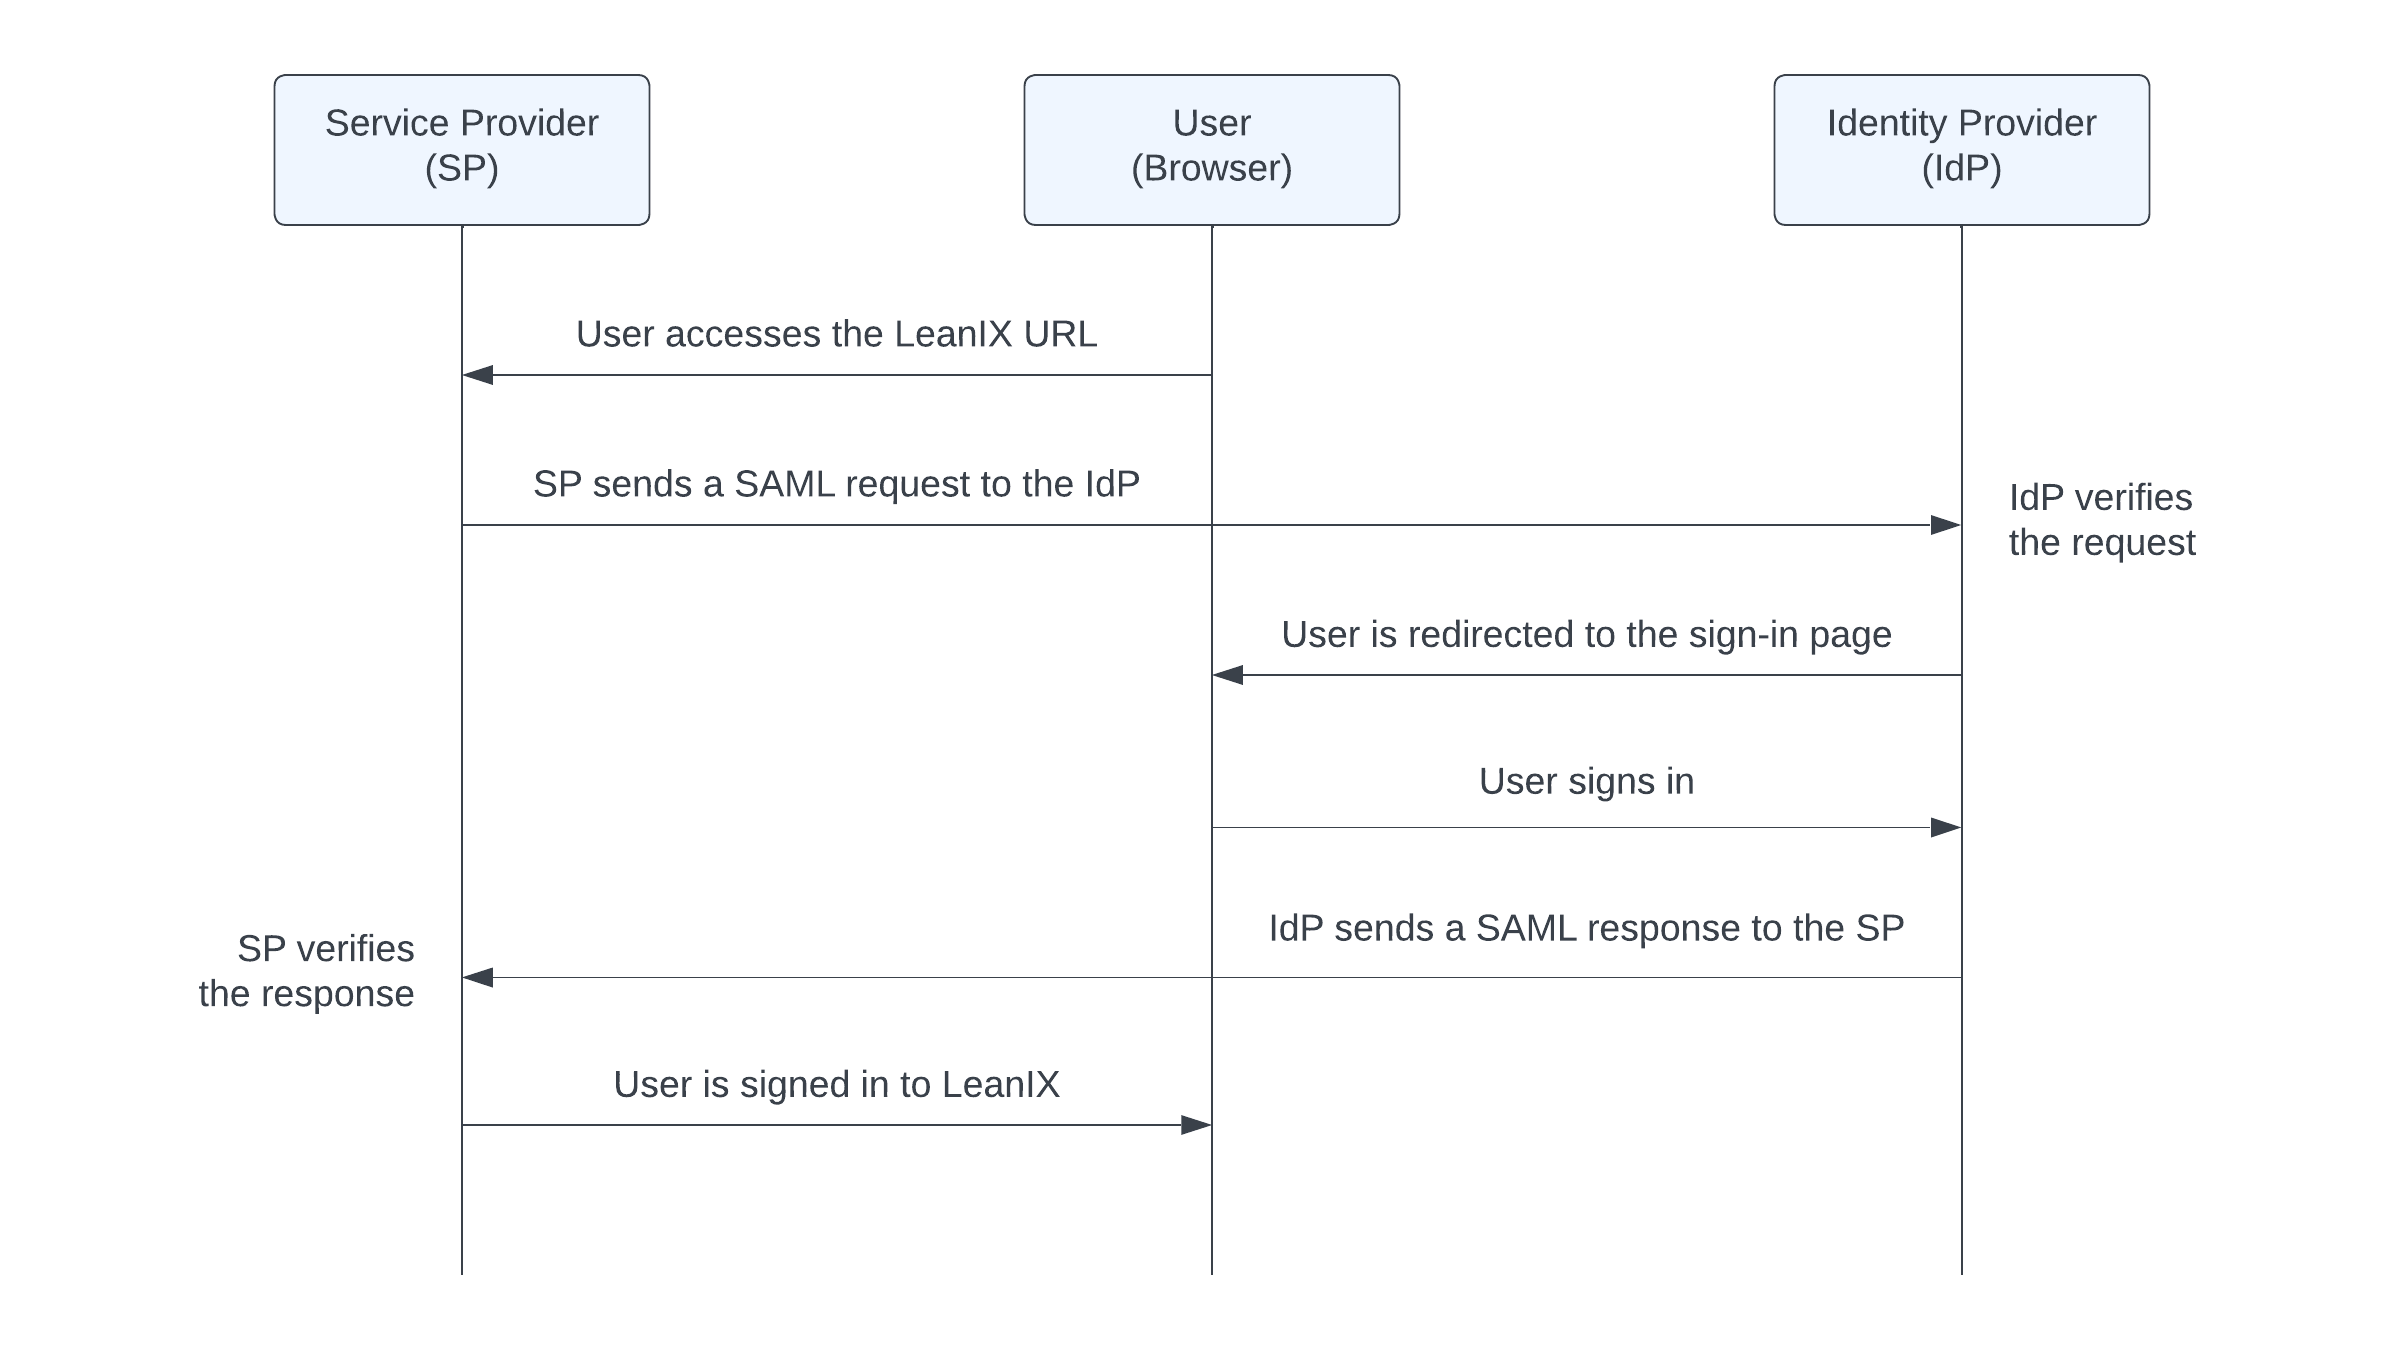
SAML 2.0 Authentication Flow
When a user attempts to access the LeanIX application through a browser, the SP first checks if the user is already authenticated. If not, the user is redirected to the identity provider system, which initiates the authentication process, typically through a username and password.
Once the user has been successfully authenticated within the IdP, the IdP sends a SAML response to the SP. The response includes relevant attributes, such as the user's email address, that serve to identify the user within LeanIX. Once the SP has verified the response, the user is granted access to the LeanIX application.
Before You Start
Before you submit a request to set up SSO, do the following:
-
Choose an identity provider. For more information, see Requirements for Identity Providers.
-
Obtain a metadata file in XML format from your IdP. You can download the file or save the link URL.
-
Decide how you want to manage user roles with SSO: internally within LeanIX or externally within your IdP. For more information, see Managing User Roles with SSO.
Note
We integrate SSO on a domain level, which means that any user provisioning implemented during the SSO authentication flow is applied to all workspaces on the domain. Each customer only receives one domain. To get advice on your use case, please contact LeanIX Support.
-
Decide if you’d like to:
- Assign a default LeanIX role to new users coming from your IdP.
- Enable the "Invite only" flow for specific workspaces. This will block users from accessing a workspace unless they have been explicitly invited to it, even if they are granted access through the IdP. A common scenario is limiting access to Sandbox workspaces.
- Enable Transient users to potentially grant them access to Self-service Portals. To learn more, see Transient Users with SSO.
SSO Configuration Process
The configuration process consists of the following steps:
- The customer provides a metadata file in XML format exported from their IdP.
To avoid possible problems with spam filters, please send either a link to the metadata file or an archive containing an XML file. Send the entire metadata, not only the certificate. - LeanIX sets up a dedicated subdomain for the customer and configures it to work with the customer's IdP. You can choose any custom subdomain. For example, you can use your company name as the subdomain, so the base URL will appear as follows:
https://your-company.leanix.net. Once the subdomain is set up, the LeanIX metadata becomes available at the following URL:https://{SUBDOMAIN}.leanix.net/Shibboleth.sso/Metadata. - The customer imports the LeanIX metadata to their IdP and configures SAML attributes according to the LeanIX SP requirements. For details, see Attribute Mapping. Ensure that the SAML 2.0 attribute names exactly match the LeanIX SP standards.
- The user ID (
uid) must be unique within LeanIX and must be in the email format, for example,[email protected]. If your IdP doesn’t transmit the domain information (@customer.com), please inform us during the SSO setup. In this case, we can enable the appropriate transformation on the LeanIX side.
- The user ID (
- The customer tests access to their workspace through the following link:
https://{SUBDOMAIN}.leanix.net/{WORKSPACE}. Note the following:- Test access to your workspace only through the provided link. Do not use other links such as
https://app.leanix.net/{WORKSPACE}orhttps://us.leanix.net/{WORKSPACE}. - During the implementation phase, we support sign-in both through SSO and through a username and password. We will deactivate sign-in with a username and password in step 5.
- We provide you with a link to the page that contains information on the current SAML session:
https://{SUBDOMAIN}.leanix.net/Shibboleth.sso/Session. If the SSO setup doesn't work, please send us the details from this page.
- Test access to your workspace only through the provided link. Do not use other links such as
- Once the customer has successfully tested the sign-in flow through their IdP, we deactivate the sign-in flow through LeanIX, which was previously the default IdP.
Inform your organization's users that the sign-in flow has changed and the old sign-in link no longer works. Share the new sign-in link with users.
Requirements for Identity Providers
When choosing an IdP for your SSO setup, ensure that:
- The IdP supports the SAML 2.0 protocol.
- The client browser has network access to the IdP.
Example Identity Providers
The following table lists example IdPs for which we've successfully tested SSO implementation.
| Identity Provider | Instructions |
|---|---|
| Okta | SSO with Okta |
| Microsoft Entra | SSO with Entra ID |
| Microsoft Active Directory Federation Services (AD FS) | SSO with Active Directory Federation Services |
| Shibboleth IdP | Refer to the Shibboleth IdP documentation |
| CA Single Sign On | Refer to the CA Single Sign On Documentation |
| Google IdP | Refer to the Google documentation |
| LemonLDAP::NG | Refer to the LemonLDAP::NG documentation |
Managing User Roles with SSO
With SSO, you can manage user roles internally within LeanIX or externally within your IdP. Choose your preferred option when requesting to set up SSO.
Additionally, you can create custom roles with more granular permissions or set up Transient users to grant them access to Self-service Portals. For more information, see:
Managing User Roles Within LeanIX
If you choose to manage user roles within LeanIX, the IdP manages authentication, while LeanIX handles authorization.
You can assign roles to users when inviting them to LeanIX. If needed, you can change user roles later.
You should decide whether you want to assign a default role in LeanIX to all new users:
- If you set a default role, this role will be automatically assigned to all new users when they first sign in to a workspace. In this case, you don't need to invite users to your workspace by clicking the Invite button.
- If you don’t set a default role, you need to invite users to your workspace by clicking the Invite button.
Managing User Roles Within the Identity Provider
If you choose to manage user roles externally within your IdP, then both authentication and authorization will be handled by the IdP.
The IdP determines the user role and maps it to the LeanIX role during the sign-in process. To learn more about mapping user roles between your IdP and LeanIX, see Attribute Mapping.
If you don't provide any role information, a default role is assigned to the user. If the default role is not set, the user loses access to LeanIX.
Depending on the user roles provided in the IdP and LeanIX, the following typical scenarios are possible:
- Scenario 1: You provide a user role in your IdP. If the user already has a role assigned in LeanIX, it is overwritten by the role from the IdP.
- Scenario 2: You don't provide a user role in your IdP, and a default role exists in LeanIX. In this case, the default role is assigned to the user. Their current role (if already assigned) is overwritten by the default role.
- Scenario 3: You don't provide a user role in your IdP, and a default role is not set in LeanIX. In this case, the user loses access to a workspace. Their existing role is not overwritten but is not used.
Attribute Mapping
Use the following attributes to configure SAML 2.0 attribute mapping in your IdP. If you're using Active Directory Federation Services (AD FS) as an IdP, see SSO with Active Directory Federation Services.
| Attribute Name | Required | Format and Example | Description |
|---|---|---|---|
firstname | Required | Format: urn:oasis:names:tc:SAML:2.0:attrname-format:uriExample: Peter | The first name of the user. |
lastname | Required | Format: urn:oasis:names:tc:SAML:2.0:attrname-format:uriExample: Schmidt | The last name of the user. |
uid | Required | Format: urn:oasis:names:tc:SAML:2.0:attrname-format:uriExample: [email protected] | The unique ID of the user in email format. The ID remains unchanged even if the name is updated. |
mail | Required | Format: urn:oasis:names:tc:SAML:2.0:attrname-format:uriExample: [email protected] | The email address of the user. |
role | Required if you manage user roles within your IdP | Format: urn:oasis:names:tc:SAML:2.0:attrname-format:uriExample: MEMBER | The role to be assigned to the user. Possible values: ADMIN, MEMBER, or VIEWER.If you submit multiple values separated with commas, the role with the highest level of privileges is assigned. If you're managing roles within LeanIX, you can omit this attribute. To learn more, see Managing User Roles with SSO. |
customerRoles | Optional | Format: urn:oasis:names:tc:SAML:2.0:attrname-format:uriExample: MANAGER | The custom role to be assigned to the user. Use this attribute only for custom roles, otherwise omit it. To learn more, see Custom User Roles. |
entryACI | Optional | Format: urn:oasis:names:tc:SAML:2.0:attrname-format:uriExample: member-orgunit1 | The ID of the Access Control Entity (ACE) of a Virtual Workspace. Use this attribute only when configuring access to a Virtual Workspace, otherwise omit it. To learn more, see SSO Configuration. |
To verify that mapping attributes are successfully configured, navigate to the SAML session page in your workspace: https://{SUBDOMAIN}.leanix.net/Shibboleth.sso/Session. The following screenshot shows a session page with a list of required user attributes that appear under Attributes.
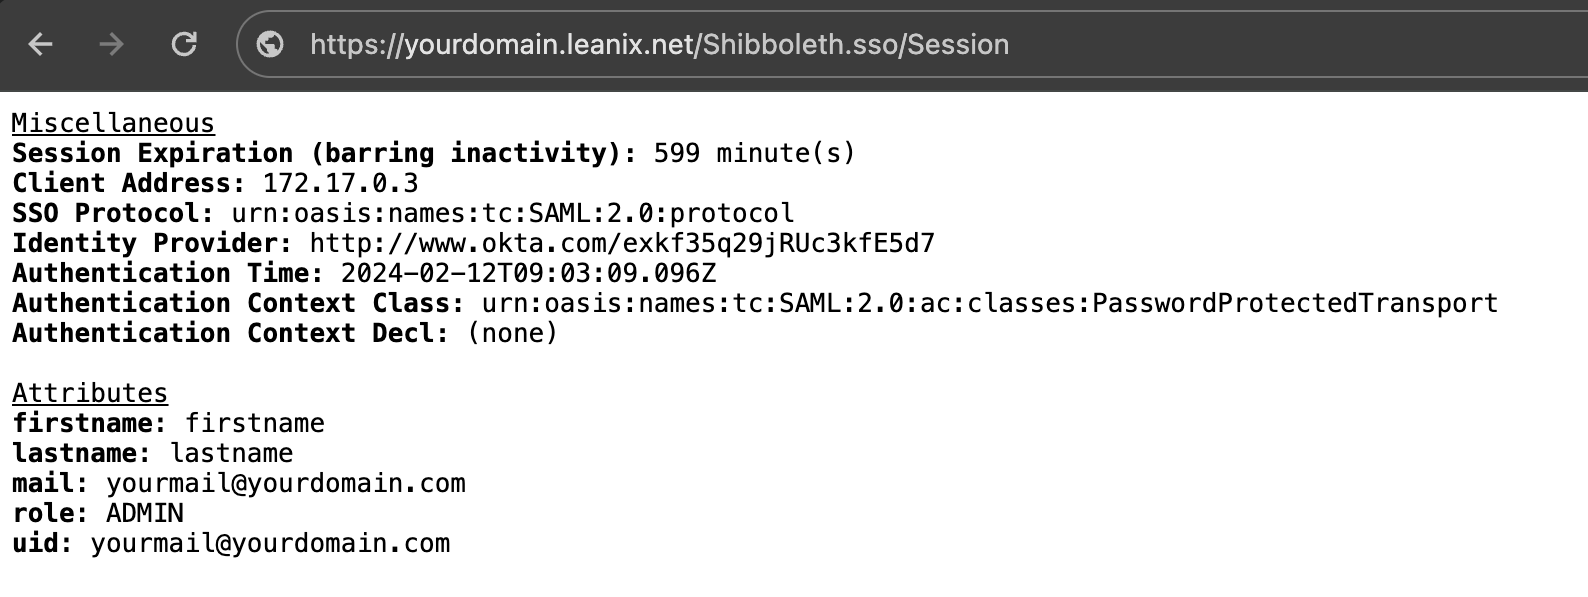
SAML Session Page
Example SAML Message with User Attributes
The following example SAML message contains required user attributes.
<saml2:AttributeStatement>
   <saml2:Attribute FriendlyName="firstname" Name="firstname" NameFormat="urn:oasis:names:tc:SAML:2.0:attrname-format:uri">
      <saml2:AttributeValue xmlns:xsi="http://www.w3.org/2001/XMLSchema-instance" xsi:type="xs:string">
      Peter
      </saml2:AttributeValue>
   </saml2:Attribute>
   <saml2:Attribute FriendlyName="lastname" Name="lastname" NameFormat="urn:oasis:names:tc:SAML:2.0:attrname-format:uri">
      <saml2:AttributeValue xmlns:xsi="http://www.w3.org/2001/XMLSchema-instance" xsi:type="xs:string">
      Schmidt
      </saml2:AttributeValue>
   </saml2:Attribute>
   <saml2:Attribute FriendlyName="uid" Name="uid" NameFormat="urn:oasis:names:tc:SAML:2.0:attrname-format:uri">
      <saml2:AttributeValue xmlns:xsi="http://www.w3.org/2001/XMLSchema-instance" xsi:type="xs:string">
      [email protected]
      </saml2:AttributeValue>
   </saml2:Attribute>
   <saml2:Attribute FriendlyName="mail" Name="mail" NameFormat="urn:oasis:names:tc:SAML:2.0:attrname-format:uri">
      <saml2:AttributeValue xmlns:xsi="http://www.w3.org/2001/XMLSchema-instance" xsi:type="xs:string">
      [email protected]
      </saml2:AttributeValue>
   </saml2:Attribute>
   <saml2:Attribute FriendlyName="role" Name="role" NameFormat="urn:oasis:names:tc:SAML:2.0:attrname-format:uri">
      <saml2:AttributeValue xmlns:xsi="http://www.w3.org/2001/XMLSchema-instance" xsi:type="xs:string">
      MEMBER
      </saml2:AttributeValue>
   </saml2:Attribute>
</saml2:AttributeStatement>
Custom User Roles
Note
You can create custom user roles only if you manage user roles externally within your IdP.
If you're managing user roles externally within your IdP, you can create custom user roles, which lets you assign permissions that are more granular than those provided by the standard roles. For more information, see Creating Custom User Roles.
Transient Users with SSO
SSO with an external IdP allows you to create Transient user roles. A Transient user is authenticated by LeanIX based on their existence in your IdP, but is not assigned any role and therefore has no access to the workspace itself.
Transient users can access a simplified version of LeanIX through Self-service Portals. You can embed these portals in your existing intranet, wiki, or any other system integrated with SSO. This setup allows you to directly share LeanIX data without having to invite users to LeanIX. For more information, see Portal.
To create Transient users, follow these steps:
-
Notify your support agent during the SSO setup or raise a dedicated ticket.
-
To grant access to the Self-service Portal for Transient users, in the Portal configuration, enter TRANSIENT in the Accessible for field.
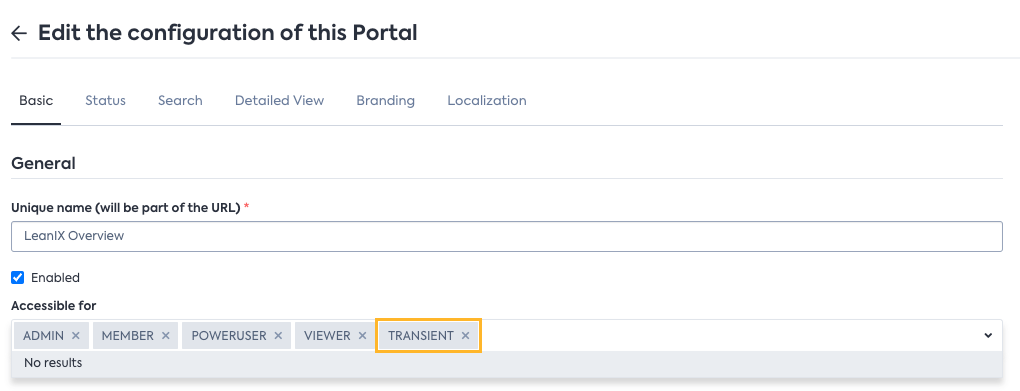
Modifying the Configuration of a Self-Service Portal to Grant Access to Transient Users
-
In your IdP, create a group of users who have access to the LeanIX application (if it doesn't already exist), but do not assign any permission role to it.
Upon signing in to LeanIX, users are assigned the temporary Transient role and are granted access to view the Self-service Portal data.
Troubleshooting
If the "A valid session was not found" message appears on the SAML session page (available at the following URL https://{SUBDOMAIN}.leanix.net/Shibboleth.sso/Session), try to do the following:
- Sign in to the workspace and open the SAML session page in a new tab or try to use the incognito mode in your browser.
- Check the attribute mapping in your IdP configuration. Ensure that you provided the required attributes as specified in the Attribute Mapping section.
- When using Entra ID as an IdP, ensure that the Namespace field is blank. For more information, see SSO with Entra ID.
Updated 3 days ago